Friday, November 4, 2016

Welcome to the Goat Hut

Clara, helped Don get the doors put on the goat hut. We have a buck coming in to breed Honey Bee and we needed to divide the paddock in half with electric fence.  Then we needed to build a hut for the buck and Bee to be in on one side while Scarlet is on the other side with access to her stall in the big barn.

 Welcome to the goat hut. Come on in!

 Originally we had the door on the back but I wanted it on the side to have a higher door. Don moved it but didn't make it higher :-/

 Don working on the door saddle

 Clara putting a latch on the door. Don is just a blur of activity as usual.

 Think it will hold the snow? 

 This little lady jumped up on the fence to see what all the activity was about. 

 Mama and Daughter checking out the new hut. Neither one are going to like it when they are separated,. When we separate them just to cut hooves or worm them they beat and scream and carry on. It may be a loud and long month while the buck is here lol.

 Bye for now!

Thursday, November 3, 2016

Liberating Roosters With a Final Offering of Sage

 Well the day came when we had to cull four young roosters from our flock. Nobody likes that day but they had reached maturity, were abusing the hens and even hurt two of them.  They were old enough that we were able to determine which personalities would work best to keep with our flock and which definitely would not. The two we ended up keeping are Welsummers. They had the best mix of predator aggression for protecting the flock yet they were extremely tolerant of us and have shown no aggression towards us. 

We butcher using the kindest method we know. The first thing we do is go into the pen with the roosters and burn sage as on offering of gratitude. We say a blessing prayer and thank the roosters for the sustenance they will give to us. We honor their beauty, life and the nutrients they have gathered from the rain, sun and earth into their bodies. I tell them that we are liberating them from their life as roosters and that they can move on in what ever form they want to. We burn the sage smudge stick over each rooster and then begin the process of transforming them into food in the kindest, most respectful way possible. 

 Don and Clara holding 2 roosters in front of the killing cones. The bucket below will gather the blood which will be composted. These cones hug the roosters in an upside down position which sedates them.

Don is holding a Buff Orpington rooster upside down so that the blood rushes to his brain causing a sedation effect which calms the bird down greatly.

 
 Once the bird is calm and still it is slipped into the cone which calms the bird even more by holding it in a snug embrace.

 Clara is calming one of the Welsummers before placing it in the cone. 

 Clara placing the rooster in the cone

I do not cut the heads off of the birds or sever the trachea when butchering them. It is my belief that the resulting suffocation causes the bird to suffer. By only cutting into the carotid artery and jugular vein the bird peacefully drifts from it's already sedated state, (from being upside down), into unconsciousness, and finally, death. Until death occurs the heart continues to beat pumping the blood out of the body. It is a very peaceful death compared to other butchering methods. If you cut the trachea (windpipe) the bird flails about in panic with an adrenalin rush from suddenly not being able to breathe. I have butchered birds both ways and once I learned to only bleed the bird out and not cut the head off I noticed how much kinder the process was to the bird. 

 I am scalding the birds at 145 degrees to loosen the skin on the feet and the feathers for easier plucking. Clara is plucking a bird o the bowl.

Don and Clara plucking the birds in the front yard where there is access to running water via the garden hose. 

 Singeing the pin feathers and hairs with a torch. 

 Clara and Don had to leave for work at this point so I was left with the job of evisceration


 After the carcasses were eviscerated    and washed I put them in this strainer basket to drain the water off so they would be nice and dry when I bagged them. This helps prevent freezer burn when the are stored in the freezer. First they will spend three days in the refrigerator as the enter into rigor mortis where the carcasses will stiffen, by the end of the 3 days they will have relaxed and become tender.


 We ended up with 13 pounds of whole chicken. I forgot to weigh the feet, hearts, gizzards, livers, and necks so probably over 14 pounds in all. 

In our previous homesteading years we would try to use every usable part of the animals we butchered.  I used to tan the hides of the rabbits and goats and sew them into various items. We used to give the hooves, ears, horns etc.. to the dogs. I also used to make stock from the bones and can it in a pressure cooker. I saved some of the lovely tail feathers from these roosters and I also saved the wings with the feathers to preserve in cornmeal and Borax. Clara is going to help me stretch the wings and get them drying tomorrow. This is my first time preserving whole, feathered chicken wings and I'm looking forward to it.

So it was a productive day and it's always a great feeling to add your own home-grown organic meat to the freezer.

Wednesday, November 2, 2016

Chicken Surgery

Today I had to preform surgery on one of our chickens. Two of them had nasty gashes in their necks from one of the roosters (Who is now in the freezer but that is for tomorrow's blog post). Anyway I've been applying poultry wound spray to both of them for a couple of days but there was a flap of skin on one of the wounds and the other hens must have picked at it and opened it way up. When I went to put the wound spray on it today I noticed that the tissue had became necrotic. The two hens that were injured were Turkens, also called "Naked Necks", because of their bare featherless necks. The roosters grab the feathers on a hens neck when they mount them but in the case of the Naked Necks there are no feathers so the rooster grabs the flesh. Then the other hens peck at it.

I briefly thought of trying to reattach the top of the skin flap to the wound but then realized the only thing to do was to cut the flap off because the skin was necrotic, dead. I was concerned about how much blood loss there would be so I grabbed a can of Bag Balm. When we used to castrate pigs we used to stuff the open wound with Bag Balm and they always healed up perfectly and didn't bleed a lot. So I gathered her up and carried her over to a quite place, which just happened to be the bucket of the tractor. I applied wound spray to disinfect the area, took a sterilized razor blade and cut off the flap. It bled a bit so I packed the area with bag balm and it looks much better. I am hoping that it heals well and quickly. I gave her some water with some apple cider vinegar and garlic and will keep applying wound spray and Bag Balm over the next few days. I have my fingers crossed that it heals up well.

 That black flap of skin having down from the wound is dead and needed to be removed. 


The necrotic flap of skin that I cut off


After applying wound spray, removing the necrotic skin and applying bag balm the wound looked much better. I will check it tomorrow and if it is not showing signs of improvement I will ask my vet for advice.  She was good as gold through the whole procedure. I really adore the temperament of these Naked Neck hens.


Sunday, October 30, 2016

Home Made Goat & Chicken Food

We were blessed to score a few bushels of organic produce seconds (Farm rejects) to feed to our chickens and goats. I discovered that if I stewed the veggies and fed them to the livestock in the broth there was a lot less waste then feeding them just raw chopped veggies. I also added apple cider vinegar and garlic. So today I stewed up another pot full of assorted vegetables for them. 

Is that stewed vegetables I smell??? Bring it on !

Got any more of those stewed veggies???


 One dish for the goats and the other for the chickens.

 The chickens love them too and they even drink the broth. 

Bye for now!

Leave a comment, let us know what you think!

Thursday, October 27, 2016

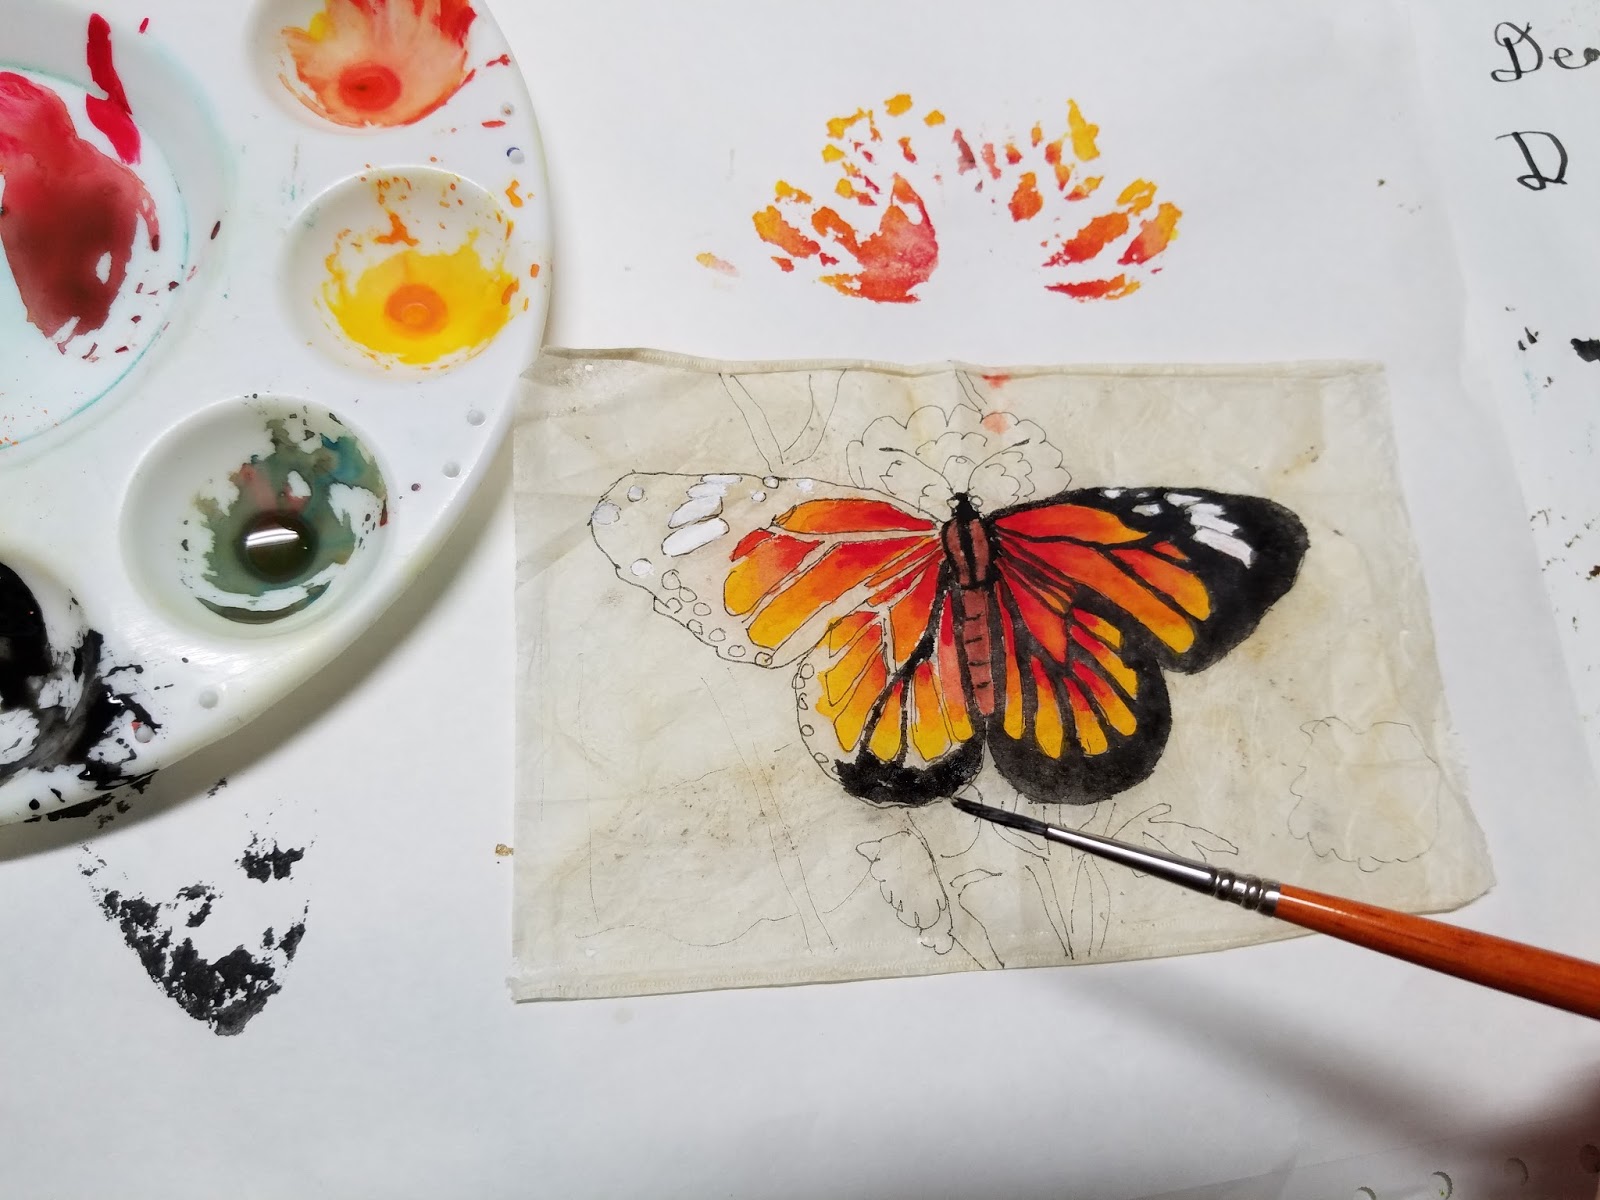
First Monarch Tea Bag Painting is Done

 A friend requested a custom order of 5 tea bag paintings with Monarch butterflies on them. I got stuck over at the barn for longer than I meant to be again this morning. The chickens water bucket was frozen and I needed to figure out a solution. Cleaning stalls and feeding a homemade mash of organic veggies took longer than I planned, mostly because there was lots of goat cuddling and conversations with chickens going on in-between chores.  Anyway by the time I got into the studio it was getting late and I was tired so I only got one of the drawings I had done over last week painted today. It was also the first real snow of the season and that was exciting.

Finished tea bag painting held up against the snowy view from my studio window. 

The drawings on the tea bags. The tags and strings have been dyed with some of my homemade walnut ink.


Tiny brush for a tiny painting


Butterfly number one is done. Now to paint the background. 

After I finished the background I sewed the tag and string back onto the tea bag.

 Painting number one out of five is done. I just have to decide how to mount it. 


Wednesday, October 26, 2016

Tea Bag Art, Organic Veggies, and Waging War

After being so crazy busy and fighting a virus for the last few weeks I hadn't had any time to get in the studio. I had a request to do a custom order for 5 tea bag paintings with monarch butterflies on them a week or so ago. I wasn't sure if I had the energy to take on the order with the farm chores  keeping me so busy. Plus as most artists know small paintings tend to be more difficult to paint then large paintings and tea bag paintings are tiny! But then I though it would be nice to spend some quality time in the studio and with all these extra farm expenses I sure could use the money lol. I have been working on the drawings over the last week and today I finally finished the last couple. Hopefully I will find the time and energy to start painting them tomorrow. 


A friend that works on an organic farm gifted us with a ton of organic veggie seconds that she gleaned from the farms compost pile. These veggies will be perfect to feed to the chickens and goats as the bounty of summer and fall gives way to the more barren winter landscape. 

 The goats were thrilled with their breakfast of fresh chopped veggies. I nearly froze my hands off chopping the veggies up in the barn after clearing the sheets of ice off the water buckets. We plunged in the heated water buckets tonight so hopefully there won't be ice in them in the morning.

When your daughter's big fat head is taking up the whole food bowl why not just use her head as your breakfast table?


 The chickens seemed to be enjoying some of the chopped up veggies this morning too, although some were more interested in free ranging outside the run.  Later in the day I made a huge pot of the steamed veggies we were given from the organic farm and I added apple cider vinegar, and a lot of minced garlic. I brought the mash out and shared it between the goats and chickens. I gave them the mash and the broth the veggies were steamed in and I think the warm food was a bit hit on this really cold day. 

We are officially waging war on the rodents in the barn that are stealing copious amounts of grain from the chicken feeders. We have put in a request at the local Animal Welfare for their "Barn cat program". They place cats that are too feral to live in homes with farmers that need rodent control in their barns. Until we hear back from them we needed to do something quick as the amount of grain the rodents are stealing daily is alarming. Grandpa's rodent and bird proof feeders have been around for generations and they seem to be very well built. We had put off buying one for a long time because our farm expenses have been way above what we expected them to be this year. Alas, if this feeder proves to be as rodent proof as the reviews claim then it will pay for itself in short order. I will post more about it once we get it put together and start the recommended 2 week training period with the chickens.